Tìm hiểu về ListView trong Android

ListView là control được sử dụng khá phổ biến trong các ứng dụng Android, có nhiều cách sử lý khác nhau. Trong bài này chúng ta sẽ tìm hiều 5 cách xử lý ListView hay sử dụng nhất được chia thành 5 trường hợp qua các ví dụ cụ thể
1) Trường hợp 1: Sử dụng ListView control với mảng dữ liệu định sẵn.
Ví dụ: hiển thị mảng dữ liệu lên trên ListView:

- Giao diện trên có 2 control:
+ListView : dùng để hiển thị mảng dữ liệu
+TextView có màu xanh lục: Dùng để hển thị vị trí và giá trị của phần tử được chọn trong ListView
- Bạn tạo một Android Project tên là : Vidu_ListView_HardCode_Array, chọn layout phù hợp và kéo thả các control vào giao diện:

- Dưới đây là nội dung của activity_main.xml:
<LinearLayoutxmlns:android="http://schemas.android.com/apk/res/android"
xmlns:tools="http://schemas.android.com/tools"
android:id="@+id/LinearLayout1"
android:layout_width="match_parent"
android:layout_height="match_parent"
android:orientation="vertical"
tools:context=".MainActivity">
<TextView
android:id="@+id/txtselection"
android:layout_width="match_parent"
android:layout_height="wrap_content"
android:background="#dd0230dd"
android:hint="Selected person here"/>
<ListView
android:id="@+id/lvperson"
android:layout_width="match_parent"
android:layout_height="wrap_content">
</ListView>
</LinearLayout>
- Đặt id cho Listview là lvperson (nhìn dòng lệnh 15 ở trên), bạn có thể định dạng thêm một số đặc tính khác nhưng trong bài tập này thì chưa cần thiết, chỉ cần hiển thị được dữ liệu lên giao diện là đã đạt yêu cầu.
- Bây giờ bạn mở MainActivity.java lên để viết code:
importandroid.os.Bundle;
importandroid.app.Activity;
importandroid.view.View;
importandroid.widget.AdapterView;
importandroid.widget.ArrayAdapter;
importandroid.widget.ListView;
importandroid.widget.TextView;
publicclassMainActivity extendsActivity {
protectedvoidonCreate(Bundle savedInstanceState) {
super.onCreate(savedInstanceState);
setContentView(R.layout.activity_main);
//1. Khởi tạo dữ liệu cho mảng arr (còn gọi là data source)
finalString arr[]={"Teo","Ty","Bin","Bo"};
//2. Lấy đối tượng Listview dựa vào id
ListView lv=(ListView) findViewById(R.id.lvperson);
//3. Gán Data source vào ArrayAdapter
ArrayAdapter<String>adapter=newArrayAdapter<String>
(this, android.R.layout.simple_list_item_1, arr);
//4. Đưa Data source vào ListView
lv.setAdapter(adapter);
finalTextView txt=(TextView) findViewById(R.id.txtselection);
//5. Thiết lập sự kiện cho Listview, khi chọn phần tử nào thì hiển thị lên TextView
lv.setOnItemClickListener(
newAdapterView.OnItemClickListener() {
publicvoidonItemClick(AdapterView<?> arg0,
View arg1,
intarg2,
longarg3) {
//đối số arg2 là vị trí phần tử trong Data Source (arr)
txt.setText("position :"+arg2+" ; value ="+arr[arg2]);
}
});
}
}
- Dòng lệnh 21.
ArrayAdapter<String>adapter=new ArrayAdapter<String>(this,android.R.layout.simple_list_item_1, arr);
- Dữ liệu từ Data source (arr) sẽ được gắn vào ArrayAdapter, ArrayAdapter sẽ gắn vào ListView.
- Bạn nhìn vào đối số đầu tiên của constructor ArrayAdapter : this, chính là context của Activity hiện tại, bạn có thể viết MainActivity.this (nếu bạn viết như thế này thì ở bất kỳ vị trí nào nó cũng hiểu là context của MainActivity, do đó các bạn nên viết như thế này để bạn có thể copy paste nó tới bất kỳ vị trí nào thì nó cũng hiểu)
- Đối số thứ 2 android.R.layout.simple_list_item_1 : android tô màu xanh, đây chính là layout Listview mà được Android xây dựng sẵn, các bài tập kế tiếp ta sẽ tự xây dựng mà không sử dụng cái có sẵn này. Như vậy thì simple_list_item_1 lưu ở đâu? và bên trong nó như thế nào?. Nó được lưu trong SDK/platforms/android-api (x)/data/res/layout/simple_list_item_1.xml. Bạn có thể xem nội dung và vị trí của layout này một cách nhanh chóng bằng đè phím Ctrl + click chuột vào dòng lệnh này, bạn sẽ thấy như bên dưới:

- Đối số thứ 3: chính là arr (data source), bạn có thể truyền vào ArrayList.
- Nhìn vào dòng lệnh 27 chỗ gán sự kiện cho ListView (bạn nhớ là chỉ cần gõ một vài ký tự đầu rồi nhấn Ctrl+ Space Bar thì các lệnh đằng sau sẽ tự động xuất hiện ra cho bạn):
+ Ta có interface AdapterView.OnItemClickListener, nó dùng để thiết lập sự kiện cho ListView, interface này có 1 phương thức trừu tượng là onItemClick nên ta override nó về xử lý trong này. Bạn cũng nhớ là chỗ này không có gõ bằng tay mà chỉ cần nhấn tổ hợp phím Ctrl + 1 chọn add unimplement method là nó tự xuất hiện. Ngoài ra nó còn nhiều sự kiện khác các bạn tự tìm hiểu thêm.
2) Trường hợp 2: Sử dụng ListView với mảng dữ liệu được lưu trong Xml
- Giao diện và xử lý sự kiện trong trường hợp này là tương tự trường hợp 1. Chỉ khác ở chỗ là dữ liệu sẽ được load từ XML, nên Tôi chỉ hướng dẫn cách tạo String – Array trong XML và cách load String-Array trong coding như thế nào.
- Bạn tạo một Android Project tên là: Vidu_ListView_Xml_Array
- Để tạo String – Array trong XML bạn làm như sau:
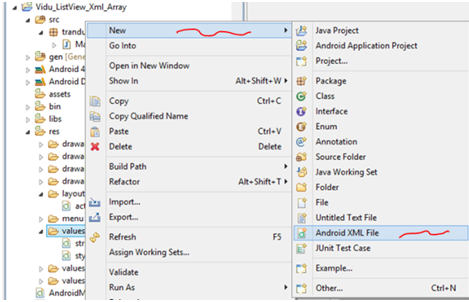
Bước 1: Bấm chuột phải vào thư mục values của Project/ chọn New/Android XML File:
- Bước 2: Màn hình New Android XML hiển thị lên, bạn chọn thông số giống như hình bên dưới, đặt tên tập tin là mystrings.xml rồi nhấn nút Finish:


Bước 3: chọn tab Resource ở hình trên:


- Bước 5: Đặt tên cho String Array, sau khi nhấn OK thì màn hình bên dưới hiển thị ra, bạn đặt tên String Array này là myarray rồi nhấn ctrl+s để lưu:


- Bạn cứ lặp liên tục thao tác ở bước 6 này, thêm bao nhiêu phần tử thì click từng đó lần Add, ở đây là Tôi thêm 3 phần tử, bạn xem hình:

<?xmlversion="1.0"encoding="utf-8"?>
<resources>
<string-arrayname="myarray">
<item>Trần Văn Tèo</item>
<item>Nguyễn Thị Tẹt</item>
<item>Hồ Văn Hiến</item>
</string-array>
</resources>
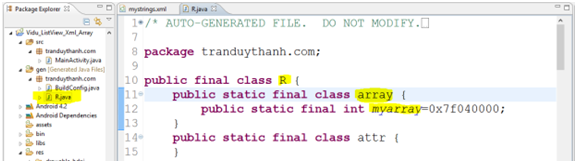
- Như vậy bạn đã biết cách tao 1 tập tin XML và biết cách tạo String Array cũng như tạo các phần tử nằm bên trong nó, Bây giờ trong Coding ta sẽ dựa vào myarray để đọc toàn bộ dữ liệu từ XML ra. Bạn cũng chú ý là myarray khi bạn tạo ra ở trên thì nó cũng được tạo ra trong gen:
* Mở MainActivity.java lên:
- Giống như trường hợp số 1, dó đó trong trường hợp này ta chỉ viết dòng lệnh đọc dữ liệu từ XML đổ về một Mảng (thay vì trường hợp 1 ta hardcode mấy phần tử khi khai báo mảng), còn các phần khác bạn tự làm giống trường hợp 1:
final String arr[]=getResources().getStringArray(R.array.myarray);
Tức là bạn thay thế dòng lệnh thứ 17 trong trường hợp 1 của MainActivity.java bằng dòng lệnh trên.
Thực thi ứng dụng bạn sẽ được kết quả như hình bên dưới:

3) Trường hợp 3: Sử dụng ArrayList và Listview control:
- Sử dụng ArrayList để lưu trữ dữ liệu và đổ lên ListView như thế nào, bạn xem giao diện của chương trình:

Mô tả:
+ Nhập dữ liệu và nhấn nút “Nhập” thì sẽ đưa vào ArrayList và hiển thị lên ListView
+ Nhấn vào phần tử nào thì hiển thị vị trí và giá trị của phần tử đó lên TextView
+ Nhấn thật lâu (long click ) vào phần tử nào đó trên ListView thì sẽ xóa phần tử đó.
* Tạo Android Project tên: Vidu_ListView_ArrayList,
Xem Layout XML của ứng dụng (activity_main.xml):
<RelativeLayoutxmlns:android="http://schemas.android.com/apk/res/android"
xmlns:tools="http://schemas.android.com/tools"
android:layout_width="match_parent"
android:layout_height="match_parent"
tools:context=".MainActivity">
<EditText
android:id="@+id/txtTen"
android:layout_width="wrap_content"
android:layout_height="wrap_content"
android:layout_alignParentTop="true"
android:inputType="text"
android:layout_toRightOf="@+id/textView1"
android:ems="10"/>
<TextView
android:id="@+id/textView1"
android:layout_width="wrap_content"
android:layout_height="wrap_content"
android:layout_alignBaseline="@+id/txtTen"
android:layout_alignBottom="@+id/txtTen"
android:layout_alignParentLeft="true"
android:background="#deb887"
android:text="Nhập tên:"/>
<Button
android:id="@+id/btnNhap"
android:layout_width="wrap_content"
android:layout_height="wrap_content"
android:layout_alignRight="@+id/txtTen"
android:layout_below="@+id/txtTen"
android:layout_toRightOf="@+id/textView1"
android:textAlignment="center"
android:text="Nhập"/>
<TextView
android:id="@+id/txtselection"
android:layout_width="match_parent"
android:layout_height="wrap_content"
android:layout_alignParentLeft="true"
android:layout_below="@+id/btnNhap"
android:background="#007380"/>
<ListView
android:id="@+id/lvperson"
android:layout_width="match_parent"
android:layout_height="wrap_content"
android:layout_alignParentLeft="true"
android:layout_below="@+id/txtselection"
android:background="#cccccc">
</ListView>
</RelativeLayout>
Xem MainActivity.java:
importjava.util.ArrayList;
importandroid.os.Bundle;
importandroid.app.Activity;
importandroid.view.View;
importandroid.widget.AdapterView;
importandroid.widget.ArrayAdapter;
importandroid.widget.Button;
importandroid.widget.EditText;
importandroid.widget.ListView;
importandroid.widget.TextView;
publicclassMainActivity extendsActivity {
EditText txtten;
TextView txtchon;
Button btn;
ListView lv;
ArrayList<String>arrList=null;
ArrayAdapter<String> adapter=null;
@Override
protectedvoidonCreate(Bundle savedInstanceState) {
super.onCreate(savedInstanceState);
setContentView(R.layout.activity_main);
txtten=(EditText) findViewById(R.id.txtTen);
txtchon=(TextView) findViewById(R.id.txtselection);
lv=(ListView) findViewById(R.id.lvperson);
//1. Tạo ArrayList object
arrList=newArrayList<String>();
//2. Gán Data Source (ArrayList object) vào ArrayAdapter
adapter=newArrayAdapter<String> (this, android.R.layout.simple_list_item_1,
arrList);
//3. gán Adapter vào ListView
lv.setAdapter(adapter);
btn=(Button) findViewById(R.id.btnNhap);
//4. Xử lý sự kiện nhấn nút Nhập
btn.setOnClickListener(newView.OnClickListener() {
publicvoidonClick(View arg0) {
arrList.add(txtten.getText()+"");
adapter.notifyDataSetChanged();
}
});
//5. Xử lý sự kiện chọn một phần tử trong ListView
lv.setOnItemClickListener(newAdapterView.OnItemClickListener() {
publicvoidonItemClick(
dapterView<?> arg0,View arg1,
intarg2,longarg3) {
txtchon.setText("position : "+ arg2+ "; value ="+arrList.get(arg2));
}
});
//6. xử lý sự kiện Long click
lv.setOnItemLongClickListener(newAdapterView.OnItemLongClickListener() {
@Override
publicbooleanonItemLongClick(AdapterView<?> arg0, View arg1, intarg2, longarg3) {
arrList.remove(arg2);//xóa phần tử thứ arg2
adapter.notifyDataSetChanged();
returnfalse;
}
});
}
}
Giải thích coding:
ArrayList bạn đã được học trong môn Java 1 rồi. Ở đây hàm adapter.notifyDataSetChanged(); Bạn chú ý là ArrayList được gán vào adapter nên mọi sự thay đổi trong ArrayList thì adapter đều nhận biết được. Khi có sự thay đổi trong ArrayList bạn chỉ cần gọi notifyDataSetChanged thì ListView sẽ được cập nhật (bởi vì Adapter được gắn vào ListView).
- Sự kiện setOnItemLongClickListener, được gắn cho ListView Item, khi nhấn lâu từ 2.5 tới 3 giây thì sự kiện này sẽ sảy ra. Tương tự như setOnItemClickListener , đối số có tên arg2 được dùng để xác định được vị trí của phần tử nằm trong ArrayList.
4) Trường hợp 4: Sử dụng ArrayList và ListView nhưng từng phần tử trong ArrayList là các Object bất kỳ
Ví dụ: xây dựng ứng dụng hiển thị danh sách nhân viên theo mô hình sau:

- Mỗi nhân viên sẽ có cách tính lương khác nhau (tên phương thức tính lương giống nhau)
- Mỗi nhân viên có phương thức toString để xuất thông tin, Nội dung xuất khác nhau. Thêm FullTime đằng sau Id và Name đối với nhân viên chính thức. Thêm Partime đằng sau Id và Name đối với nhân viên thời vụ.
- Xem giao diện chương trình:


<LinearLayoutxmlns:android="http://schemas.android.com/apk/res/android"
xmlns:tools="http://schemas.android.com/tools"
android:id="@+id/LinearLayout1"
android:layout_width="match_parent"
android:layout_height="match_parent"
android:orientation="vertical"
tools:context=".MainActivity">
<TextView
android:id="@+id/textView1"
android:layout_width="match_parent"
android:layout_height="wrap_content"
android:background="#008000"
android:gravity="center"
android:text="Quản lý nhân viên"
android:textColor="#FFFFFF"
android:textSize="20sp"/>
<TableLayout
android:layout_width="match_parent"
android:stretchColumns="*"
android:layout_height="wrap_content">
<TableRow
android:id="@+id/tableRow1"
android:layout_width="wrap_content"
android:layout_height="wrap_content">
<TextView
android:id="@+id/textView2"
android:layout_width="wrap_content"
android:layout_height="wrap_content"
android:text="Mã NV:"/>
<EditText
android:id="@+id/editMa"
android:layout_width="wrap_content"
android:layout_height="wrap_content"
android:layout_span="2"
android:ems="10">
<requestFocus/>
</EditText>
</TableRow>
<TableRow
android:id="@+id/tableRow2"
android:layout_width="wrap_content"
android:layout_height="wrap_content">
<TextView
android:id="@+id/textView3"
android:layout_width="wrap_content"
android:layout_height="wrap_content"
android:text="Tên NV:"/>
<EditText
android:id="@+id/editTen"
android:layout_width="wrap_content"
android:layout_height="wrap_content"
android:layout_span="2"
android:ems="10"/>
</TableRow>
<TableRow
android:id="@+id/tableRow3"
android:layout_width="wrap_content"
android:layout_height="wrap_content">
<TextView
android:id="@+id/textView4"
android:layout_width="wrap_content"
android:layout_height="wrap_content"
android:text="Loại NV:"/>
<RadioGroup
android:id="@+id/radiogroud1"
android:orientation="horizontal">
<RadioButton
android:id="@+id/radChinhthuc"
android:layout_width="wrap_content"
android:layout_height="wrap_content"
android:checked="true"
android:text="Chính thức"/>
<RadioButton
android:id="@+id/radThoivu"
android:layout_width="wrap_content"
android:layout_height="wrap_content"
android:text="Thời vụ"/>
</RadioGroup>
</TableRow>
<TableRow
android:id="@+id/tableRow4"
android:layout_width="wrap_content"
android:layout_height="wrap_content">
<Button
android:id="@+id/btnnhap"
android:layout_width="wrap_content"
android:layout_height="wrap_content"
android:layout_column="1"
android:text="Nhập NV"/>
</TableRow>
</TableLayout>
<TextView
android:id="@+id/textView5"
android:layout_width="match_parent"
android:layout_height="wrap_content"
android:background="#008000"/>
<ListView
android:id="@+id/lvnhanvien"
android:layout_width="match_parent"
android:layout_height="wrap_content">
</ListView>
</LinearLayout>
- Xem nội dung từng class:
+ Abstract class Employee:
publicabstractclassEmployee {
privateString id;
privateString name;
publicString getId() {
returnid;
}
publicvoidsetId(String id) {
this.id = id;
}
publicString getName() {
returnname;
}
publicvoidsetName(String name) {
this.name = name;
}
publicabstractdoubleTinhLuong();
@Override
publicString toString() {
// TODO Auto-generated method stub
returnthis.id+" - "+this.name;
}
}
+ class EmployeeFullTime:
publicclassEmployeeFullTime extendsEmployee {
@Override
publicdoubleTinhLuong() {
return500;
}
@Override
publicString toString() {
// TODO Auto-generated method stub
returnsuper.toString() +" -->FullTime="+TinhLuong();
}
}
+ Class EmployeePartTime:
publicclassEmployeePartTime extendsEmployee {
@Override
publicdoubleTinhLuong() {
// TODO Auto-generated method stub
return150;
}
@Override
publicString toString() {
// TODO Auto-generated method stub
returnsuper.toString() +" -->PartTime="+TinhLuong();
}
}
- Bạn thấy là 2 class dẫn xuất từ Employee Tôi làm đơn giản là cách tính lương khác nhau. Đối với FullTime thì lương 500, Partime lương 150. và hàm Xuất toString() cũng khác nhau 1 xí.
- Ở đây ta sẽ áp dụng tính đa hình thông qua thừa kế, chỉ cần dùng một biến có kiểu Employee, nhưng nó có thể hiểu FullTime hoặc Partime và xuất ra thông tin đúng như mình mong đợi.
- Xem class MainActivity.java:
importjava.util.ArrayList;
importandroid.os.Bundle;
importandroid.app.Activity;
importandroid.view.View;
importandroid.view.View.OnClickListener;
importandroid.widget.ArrayAdapter;
importandroid.widget.Button;
importandroid.widget.EditText;
importandroid.widget.ListView;
importandroid.widget.RadioGroup;
publicclassMainActivity extendsActivity {
EditText editId,editName;
Button btnNhap;
RadioGroup radgroup;
ListView lvNhanvien;
ArrayList<Employee>arrEmployee=newArrayList<Employee>();
ArrayAdapter<Employee>adapter=null;
//Khai báo 1 employee object
Employee employee=null;
@Override
protectedvoidonCreate(Bundle savedInstanceState) {
super.onCreate(savedInstanceState);
setContentView(R.layout.activity_main);
editId=(EditText) findViewById(R.id.editMa);
editName=(EditText) findViewById(R.id.editTen);
btnNhap=(Button) findViewById(R.id.btnnhap);
radgroup=(RadioGroup) findViewById(R.id.radiogroud1);
lvNhanvien=(ListView) findViewById(R.id.lvnhanvien);
//đưa Data Source là các employee vào Adapter
adapter=newArrayAdapter<Employee>(this,
android.R.layout.simple_list_item_1,
arrEmployee);
//đưa adapter vào ListView
lvNhanvien.setAdapter(adapter);
btnNhap.setOnClickListener(newOnClickListener() {
@Override
publicvoidonClick(View arg0) {
// TODO Auto-generated method stub
processNhap();
}
});
}
//Xử lý sự kiện nhập
publicvoidprocessNhap()
{
//Lấy ra đúng id của Radio Button được checked
intradId=radgroup.getCheckedRadioButtonId();
String id=editId.getText()+"";
String name=editName.getText()+"";
if(radId==R.id.radChinhthuc)
{
//tạo instance là FullTime
employee=newEmployeeFullTime();
}
else
{
//Tạo instance là Partime
employee=newEmployeePartTime();
}
//FullTime hay Partime thì cũng là Employee
//nên có các hàm này là hiển nhiên
employee.setId(id);
employee.setName(name);
//Đưa employee vào ArrayList
arrEmployee.add(employee);
//Cập nhập giao diện
adapter.notifyDataSetChanged();
}
}
- Chương trình sẽ tự động hiển thị đúng loại Employee mà ta chọn lựa trên giao diện, ở đây bạn lại được ôn tập thêm về tính đa hình trong java. Ứng với mỗi loại Employee nó sẽ tự động gọi hàm toString của loại đó.
Ví dụ: Nếu Employee đó là FullTime thì nó gọi toString của FullTime và ngược lại với PartTime cũng vậy nó sẽ lấy toString của PartTime.
5)Trường hợp 5: Sử dụng ListView nhưng dưới dạng ListActivity
- Thay vì kế thừa từ Activity, ta sẽ cho kế thừa từ ListActivity.
- Và dĩ nhiên cách đặt Id cho ListView cũng có sự khác biệt.
- Bạn xem giao diện bên dưới:

- Xem cách làm XML layout (activity_main.xml):
<LinearLayoutxmlns:android="http://schemas.android.com/apk/res/android"
xmlns:tools="http://schemas.android.com/tools"
android:id="@+id/LinearLayout1"
android:layout_width="match_parent"
android:layout_height="match_parent"
android:orientation="vertical"
tools:context=".MainActivity">
<TextView
android:id="@+id/selection"
android:layout_width="match_parent"
android:layout_height="wrap_content"
android:background="#008000"
android:textColor="#FFFFFF"
android:textSize="20sp"/>
<ListView
android:id="@android:id/list"
android:layout_width="match_parent"
android:layout_height="wrap_content">
</ListView>
<TextView
android:id="@android:id/empty"
android:layout_width="wrap_content"
android:layout_height="wrap_content"
android:text="Không có gì cả"/>
</LinearLayout>
- Bạn nhìn vào dòng lệnh thứ 18:
android:id=”@android:id/list“, bạn viết y xì như thế này. Bởi vì nó là id được định nghĩa sẵn bên trong Android.
- Tiếp tục nhìn vào dòng lệnh 24:
android:id=”@android:id/empty“ , cũng là có sẵn của Android. Nó có tác dụng tự động thông báo khi ListView của bạn không có bất kỳ một phần tử nào cả.
- Xem class MainActivity.java:
importandroid.os.Bundle;
importandroid.app.ListActivity;
importandroid.view.View;
importandroid.widget.ArrayAdapter;
importandroid.widget.ListView;
importandroid.widget.TextView;
publicclassMainActivity extendsListActivity {
TextView selection;
String arr[]={"Intel","SamSung",
"Nokia","Simen","AMD",
"KIC","ECD"};
ArrayAdapter<String >adapter=null;
@Override
protectedvoidonCreate(Bundle savedInstanceState) {
super.onCreate(savedInstanceState);
setContentView(R.layout.activity_main);
//Thiết lập Data Source cho Adapter
adapter=newArrayAdapter<String>(this,android.R.layout.simple_list_item_1,arr);
//Gán Adapter vào ListView
//Nhớ là phải đặt id cho ListView theo đúng quy tắc
setListAdapter(adapter);
selection=(TextView) findViewById(R.id.selection);
}
@Override
protectedvoidonListItemClick(ListView l, View v, intposition, longid) {
// TODO Auto-generated method stub
super.onListItemClick(l, v, position, id);
String txt="postion = "+position +"; value ="+arr[position];
selection.setText(txt);
}
}
- Bạn nhìn vào dòng lệnh số 10: bạn thấy đấy, Tôi cho kế thừa từ ListActivity chứ không phảiActivity. (Android đã viết class ListActivity kế thừa từ Activity rồi). Tức là ListActivity cũng chính là Activity.
- Bạn nhìn vào dòng lệnh số 28:
setListAdapter(adapter);
Ở đây ta hoàn toàn không “Lôi” control ListView ra. Mà ta chỉ cần gọi hàm setListAdapter thì ListView cũng tự động cập nhập dữ liệu. Bạn phải làm chính xác 2 nơi thì mới được như vậy:
1. Kết thừa từ ListActivity,
2. đặt id cho ListView theo đúng quy tắc android:id=”@android:id/list”

ListView là control được sử dụng khá phổ biến trong các ứng dụng Android, có nhiều cách sử lý khác nhau. Trong bài này chúng ta sẽ tìm hiều 5 cách xử lý ListView hay sử dụng nhất được chia thành 5 trường hợp qua các ví dụ cụ thể
1) Trường hợp 1: Sử dụng ListView control với mảng dữ liệu định sẵn.
Ví dụ: hiển thị mảng dữ liệu lên trên ListView:

Hình 1
- Giao diện trên có 2 control:
+ListView : dùng để hiển thị mảng dữ liệu
+TextView có màu xanh lục: Dùng để hển thị vị trí và giá trị của phần tử được chọn trong ListView
- Bạn tạo một Android Project tên là : Vidu_ListView_HardCode_Array, chọn layout phù hợp và kéo thả các control vào giao diện:

Hình 2
- Dưới đây là nội dung của activity_main.xml:
<LinearLayoutxmlns:android="http://schemas.android.com/apk/res/android"
xmlns:tools="http://schemas.android.com/tools"
android:id="@+id/LinearLayout1"
android:layout_width="match_parent"
android:layout_height="match_parent"
android:orientation="vertical"
tools:context=".MainActivity">
<TextView
android:id="@+id/txtselection"
android:layout_width="match_parent"
android:layout_height="wrap_content"
android:background="#dd0230dd"
android:hint="Selected person here"/>
<ListView
android:id="@+id/lvperson"
android:layout_width="match_parent"
android:layout_height="wrap_content">
</ListView>
</LinearLayout>
- Đặt id cho Listview là lvperson (nhìn dòng lệnh 15 ở trên), bạn có thể định dạng thêm một số đặc tính khác nhưng trong bài tập này thì chưa cần thiết, chỉ cần hiển thị được dữ liệu lên giao diện là đã đạt yêu cầu.
- Bây giờ bạn mở MainActivity.java lên để viết code:
importandroid.os.Bundle;
importandroid.app.Activity;
importandroid.view.View;
importandroid.widget.AdapterView;
importandroid.widget.ArrayAdapter;
importandroid.widget.ListView;
importandroid.widget.TextView;
publicclassMainActivity extendsActivity {
protectedvoidonCreate(Bundle savedInstanceState) {
super.onCreate(savedInstanceState);
setContentView(R.layout.activity_main);
//1. Khởi tạo dữ liệu cho mảng arr (còn gọi là data source)
finalString arr[]={"Teo","Ty","Bin","Bo"};
//2. Lấy đối tượng Listview dựa vào id
ListView lv=(ListView) findViewById(R.id.lvperson);
//3. Gán Data source vào ArrayAdapter
ArrayAdapter<String>adapter=newArrayAdapter<String>
(this, android.R.layout.simple_list_item_1, arr);
//4. Đưa Data source vào ListView
lv.setAdapter(adapter);
finalTextView txt=(TextView) findViewById(R.id.txtselection);
//5. Thiết lập sự kiện cho Listview, khi chọn phần tử nào thì hiển thị lên TextView
lv.setOnItemClickListener(
newAdapterView.OnItemClickListener() {
publicvoidonItemClick(AdapterView<?> arg0,
View arg1,
intarg2,
longarg3) {
//đối số arg2 là vị trí phần tử trong Data Source (arr)
txt.setText("position :"+arg2+" ; value ="+arr[arg2]);
}
});
}
}
- Dòng lệnh 21.
ArrayAdapter<String>adapter=new ArrayAdapter<String>(this,android.R.layout.simple_list_item_1, arr);
- Dữ liệu từ Data source (arr) sẽ được gắn vào ArrayAdapter, ArrayAdapter sẽ gắn vào ListView.
- Bạn nhìn vào đối số đầu tiên của constructor ArrayAdapter : this, chính là context của Activity hiện tại, bạn có thể viết MainActivity.this (nếu bạn viết như thế này thì ở bất kỳ vị trí nào nó cũng hiểu là context của MainActivity, do đó các bạn nên viết như thế này để bạn có thể copy paste nó tới bất kỳ vị trí nào thì nó cũng hiểu)
- Đối số thứ 2 android.R.layout.simple_list_item_1 : android tô màu xanh, đây chính là layout Listview mà được Android xây dựng sẵn, các bài tập kế tiếp ta sẽ tự xây dựng mà không sử dụng cái có sẵn này. Như vậy thì simple_list_item_1 lưu ở đâu? và bên trong nó như thế nào?. Nó được lưu trong SDK/platforms/android-api (x)/data/res/layout/simple_list_item_1.xml. Bạn có thể xem nội dung và vị trí của layout này một cách nhanh chóng bằng đè phím Ctrl + click chuột vào dòng lệnh này, bạn sẽ thấy như bên dưới:

Hình 3
- Đối số thứ 3: chính là arr (data source), bạn có thể truyền vào ArrayList.
- Nhìn vào dòng lệnh 27 chỗ gán sự kiện cho ListView (bạn nhớ là chỉ cần gõ một vài ký tự đầu rồi nhấn Ctrl+ Space Bar thì các lệnh đằng sau sẽ tự động xuất hiện ra cho bạn):
+ Ta có interface AdapterView.OnItemClickListener, nó dùng để thiết lập sự kiện cho ListView, interface này có 1 phương thức trừu tượng là onItemClick nên ta override nó về xử lý trong này. Bạn cũng nhớ là chỗ này không có gõ bằng tay mà chỉ cần nhấn tổ hợp phím Ctrl + 1 chọn add unimplement method là nó tự xuất hiện. Ngoài ra nó còn nhiều sự kiện khác các bạn tự tìm hiểu thêm.
2) Trường hợp 2: Sử dụng ListView với mảng dữ liệu được lưu trong Xml
- Giao diện và xử lý sự kiện trong trường hợp này là tương tự trường hợp 1. Chỉ khác ở chỗ là dữ liệu sẽ được load từ XML, nên Tôi chỉ hướng dẫn cách tạo String – Array trong XML và cách load String-Array trong coding như thế nào.
- Bạn tạo một Android Project tên là: Vidu_ListView_Xml_Array
- Để tạo String – Array trong XML bạn làm như sau:
Bước 1: Bấm chuột phải vào thư mục values của Project/ chọn New/Android XML File:

Hình 4
- Bước 2: Màn hình New Android XML hiển thị lên, bạn chọn thông số giống như hình bên dưới, đặt tên tập tin là mystrings.xml rồi nhấn nút Finish:

Hình 5
Xem kết quả khi bấm nút Finish và quan sát cho nhận xét:
Hình 6
Chú ý là ta cũng có thể thêm dữ liệu vào tập tin strings.xml.Bước 3: chọn tab Resource ở hình trên:

Hình 7
- Bước 4: Bấm nút “Add…” ở màn hình trên để thêm String-Array:
Hình 8
Ở màn hình trên bạn chọn String Array rồi nhấn OK:- Bước 5: Đặt tên cho String Array, sau khi nhấn OK thì màn hình bên dưới hiển thị ra, bạn đặt tên String Array này là myarray rồi nhấn ctrl+s để lưu:

Hình 9
- Bước 6: Thêm các phần tử vào String Array, tiếp tục bấm nút Add ở màn hình bên trên:
Hình 10
-Sau khi nhấn OK thì nó sẽ cho phép bạn nhập giá trị cho phần tử.- Bạn cứ lặp liên tục thao tác ở bước 6 này, thêm bao nhiêu phần tử thì click từng đó lần Add, ở đây là Tôi thêm 3 phần tử, bạn xem hình:

Hình 11
- Xem nội dung XML:<?xmlversion="1.0"encoding="utf-8"?>
<resources>
<string-arrayname="myarray">
<item>Trần Văn Tèo</item>
<item>Nguyễn Thị Tẹt</item>
<item>Hồ Văn Hiến</item>
</string-array>
</resources>
- Như vậy bạn đã biết cách tao 1 tập tin XML và biết cách tạo String Array cũng như tạo các phần tử nằm bên trong nó, Bây giờ trong Coding ta sẽ dựa vào myarray để đọc toàn bộ dữ liệu từ XML ra. Bạn cũng chú ý là myarray khi bạn tạo ra ở trên thì nó cũng được tạo ra trong gen:

Hình 12
- Như bạn thấy đó, trong coding ta sẽ dựa vào đây để lấy ra: R.array.myarray.* Mở MainActivity.java lên:
- Giống như trường hợp số 1, dó đó trong trường hợp này ta chỉ viết dòng lệnh đọc dữ liệu từ XML đổ về một Mảng (thay vì trường hợp 1 ta hardcode mấy phần tử khi khai báo mảng), còn các phần khác bạn tự làm giống trường hợp 1:
final String arr[]=getResources().getStringArray(R.array.myarray);
Tức là bạn thay thế dòng lệnh thứ 17 trong trường hợp 1 của MainActivity.java bằng dòng lệnh trên.
Thực thi ứng dụng bạn sẽ được kết quả như hình bên dưới:

Hình 13
- Tôi nghĩ tới đây bạn đã thật sự hiểu trường hợp 2.3) Trường hợp 3: Sử dụng ArrayList và Listview control:
- Sử dụng ArrayList để lưu trữ dữ liệu và đổ lên ListView như thế nào, bạn xem giao diện của chương trình:

Hình 14
Mô tả:
+ Nhập dữ liệu và nhấn nút “Nhập” thì sẽ đưa vào ArrayList và hiển thị lên ListView
+ Nhấn vào phần tử nào thì hiển thị vị trí và giá trị của phần tử đó lên TextView
+ Nhấn thật lâu (long click ) vào phần tử nào đó trên ListView thì sẽ xóa phần tử đó.
* Tạo Android Project tên: Vidu_ListView_ArrayList,
Xem Layout XML của ứng dụng (activity_main.xml):
<RelativeLayoutxmlns:android="http://schemas.android.com/apk/res/android"
xmlns:tools="http://schemas.android.com/tools"
android:layout_width="match_parent"
android:layout_height="match_parent"
tools:context=".MainActivity">
<EditText
android:id="@+id/txtTen"
android:layout_width="wrap_content"
android:layout_height="wrap_content"
android:layout_alignParentTop="true"
android:inputType="text"
android:layout_toRightOf="@+id/textView1"
android:ems="10"/>
<TextView
android:id="@+id/textView1"
android:layout_width="wrap_content"
android:layout_height="wrap_content"
android:layout_alignBaseline="@+id/txtTen"
android:layout_alignBottom="@+id/txtTen"
android:layout_alignParentLeft="true"
android:background="#deb887"
android:text="Nhập tên:"/>
<Button
android:id="@+id/btnNhap"
android:layout_width="wrap_content"
android:layout_height="wrap_content"
android:layout_alignRight="@+id/txtTen"
android:layout_below="@+id/txtTen"
android:layout_toRightOf="@+id/textView1"
android:textAlignment="center"
android:text="Nhập"/>
<TextView
android:id="@+id/txtselection"
android:layout_width="match_parent"
android:layout_height="wrap_content"
android:layout_alignParentLeft="true"
android:layout_below="@+id/btnNhap"
android:background="#007380"/>
<ListView
android:id="@+id/lvperson"
android:layout_width="match_parent"
android:layout_height="wrap_content"
android:layout_alignParentLeft="true"
android:layout_below="@+id/txtselection"
android:background="#cccccc">
</ListView>
</RelativeLayout>
Xem MainActivity.java:
importjava.util.ArrayList;
importandroid.os.Bundle;
importandroid.app.Activity;
importandroid.view.View;
importandroid.widget.AdapterView;
importandroid.widget.ArrayAdapter;
importandroid.widget.Button;
importandroid.widget.EditText;
importandroid.widget.ListView;
importandroid.widget.TextView;
publicclassMainActivity extendsActivity {
EditText txtten;
TextView txtchon;
Button btn;
ListView lv;
ArrayList<String>arrList=null;
ArrayAdapter<String> adapter=null;
@Override
protectedvoidonCreate(Bundle savedInstanceState) {
super.onCreate(savedInstanceState);
setContentView(R.layout.activity_main);
txtten=(EditText) findViewById(R.id.txtTen);
txtchon=(TextView) findViewById(R.id.txtselection);
lv=(ListView) findViewById(R.id.lvperson);
//1. Tạo ArrayList object
arrList=newArrayList<String>();
//2. Gán Data Source (ArrayList object) vào ArrayAdapter
adapter=newArrayAdapter<String> (this, android.R.layout.simple_list_item_1,
arrList);
//3. gán Adapter vào ListView
lv.setAdapter(adapter);
btn=(Button) findViewById(R.id.btnNhap);
//4. Xử lý sự kiện nhấn nút Nhập
btn.setOnClickListener(newView.OnClickListener() {
publicvoidonClick(View arg0) {
arrList.add(txtten.getText()+"");
adapter.notifyDataSetChanged();
}
});
//5. Xử lý sự kiện chọn một phần tử trong ListView
lv.setOnItemClickListener(newAdapterView.OnItemClickListener() {
publicvoidonItemClick(
dapterView<?> arg0,View arg1,
intarg2,longarg3) {
txtchon.setText("position : "+ arg2+ "; value ="+arrList.get(arg2));
}
});
//6. xử lý sự kiện Long click
lv.setOnItemLongClickListener(newAdapterView.OnItemLongClickListener() {
@Override
publicbooleanonItemLongClick(AdapterView<?> arg0, View arg1, intarg2, longarg3) {
arrList.remove(arg2);//xóa phần tử thứ arg2
adapter.notifyDataSetChanged();
returnfalse;
}
});
}
}
Giải thích coding:
ArrayList bạn đã được học trong môn Java 1 rồi. Ở đây hàm adapter.notifyDataSetChanged(); Bạn chú ý là ArrayList được gán vào adapter nên mọi sự thay đổi trong ArrayList thì adapter đều nhận biết được. Khi có sự thay đổi trong ArrayList bạn chỉ cần gọi notifyDataSetChanged thì ListView sẽ được cập nhật (bởi vì Adapter được gắn vào ListView).
- Sự kiện setOnItemLongClickListener, được gắn cho ListView Item, khi nhấn lâu từ 2.5 tới 3 giây thì sự kiện này sẽ sảy ra. Tương tự như setOnItemClickListener , đối số có tên arg2 được dùng để xác định được vị trí của phần tử nằm trong ArrayList.
4) Trường hợp 4: Sử dụng ArrayList và ListView nhưng từng phần tử trong ArrayList là các Object bất kỳ
Ví dụ: xây dựng ứng dụng hiển thị danh sách nhân viên theo mô hình sau:

Hình 15
- Có 2 loại nhân viên : Nhân viên chính thức (EmployeeFullTime ) và nhân viên thời vụ (EmployeePartime).- Mỗi nhân viên sẽ có cách tính lương khác nhau (tên phương thức tính lương giống nhau)
- Mỗi nhân viên có phương thức toString để xuất thông tin, Nội dung xuất khác nhau. Thêm FullTime đằng sau Id và Name đối với nhân viên chính thức. Thêm Partime đằng sau Id và Name đối với nhân viên thời vụ.
- Xem giao diện chương trình:

Hình 16
-Tạo một Android Project tên: Vidu_ListView_ArrayList_Object, cấu trúc như bên dưới:
Hình 17
- Layout XML (activity_main.xml):<LinearLayoutxmlns:android="http://schemas.android.com/apk/res/android"
xmlns:tools="http://schemas.android.com/tools"
android:id="@+id/LinearLayout1"
android:layout_width="match_parent"
android:layout_height="match_parent"
android:orientation="vertical"
tools:context=".MainActivity">
<TextView
android:id="@+id/textView1"
android:layout_width="match_parent"
android:layout_height="wrap_content"
android:background="#008000"
android:gravity="center"
android:text="Quản lý nhân viên"
android:textColor="#FFFFFF"
android:textSize="20sp"/>
<TableLayout
android:layout_width="match_parent"
android:stretchColumns="*"
android:layout_height="wrap_content">
<TableRow
android:id="@+id/tableRow1"
android:layout_width="wrap_content"
android:layout_height="wrap_content">
<TextView
android:id="@+id/textView2"
android:layout_width="wrap_content"
android:layout_height="wrap_content"
android:text="Mã NV:"/>
<EditText
android:id="@+id/editMa"
android:layout_width="wrap_content"
android:layout_height="wrap_content"
android:layout_span="2"
android:ems="10">
<requestFocus/>
</EditText>
</TableRow>
<TableRow
android:id="@+id/tableRow2"
android:layout_width="wrap_content"
android:layout_height="wrap_content">
<TextView
android:id="@+id/textView3"
android:layout_width="wrap_content"
android:layout_height="wrap_content"
android:text="Tên NV:"/>
<EditText
android:id="@+id/editTen"
android:layout_width="wrap_content"
android:layout_height="wrap_content"
android:layout_span="2"
android:ems="10"/>
</TableRow>
<TableRow
android:id="@+id/tableRow3"
android:layout_width="wrap_content"
android:layout_height="wrap_content">
<TextView
android:id="@+id/textView4"
android:layout_width="wrap_content"
android:layout_height="wrap_content"
android:text="Loại NV:"/>
<RadioGroup
android:id="@+id/radiogroud1"
android:orientation="horizontal">
<RadioButton
android:id="@+id/radChinhthuc"
android:layout_width="wrap_content"
android:layout_height="wrap_content"
android:checked="true"
android:text="Chính thức"/>
<RadioButton
android:id="@+id/radThoivu"
android:layout_width="wrap_content"
android:layout_height="wrap_content"
android:text="Thời vụ"/>
</RadioGroup>
</TableRow>
<TableRow
android:id="@+id/tableRow4"
android:layout_width="wrap_content"
android:layout_height="wrap_content">
<Button
android:id="@+id/btnnhap"
android:layout_width="wrap_content"
android:layout_height="wrap_content"
android:layout_column="1"
android:text="Nhập NV"/>
</TableRow>
</TableLayout>
<TextView
android:id="@+id/textView5"
android:layout_width="match_parent"
android:layout_height="wrap_content"
android:background="#008000"/>
<ListView
android:id="@+id/lvnhanvien"
android:layout_width="match_parent"
android:layout_height="wrap_content">
</ListView>
</LinearLayout>
- Xem nội dung từng class:
publicabstractclassEmployee {
privateString id;
privateString name;
publicString getId() {
returnid;
}
publicvoidsetId(String id) {
this.id = id;
}
publicString getName() {
returnname;
}
publicvoidsetName(String name) {
this.name = name;
}
publicabstractdoubleTinhLuong();
@Override
publicString toString() {
// TODO Auto-generated method stub
returnthis.id+" - "+this.name;
}
}
+ class EmployeeFullTime:
publicclassEmployeeFullTime extendsEmployee {
@Override
publicdoubleTinhLuong() {
return500;
}
@Override
publicString toString() {
// TODO Auto-generated method stub
returnsuper.toString() +" -->FullTime="+TinhLuong();
}
}
+ Class EmployeePartTime:
publicclassEmployeePartTime extendsEmployee {
@Override
publicdoubleTinhLuong() {
// TODO Auto-generated method stub
return150;
}
@Override
publicString toString() {
// TODO Auto-generated method stub
returnsuper.toString() +" -->PartTime="+TinhLuong();
}
}
- Bạn thấy là 2 class dẫn xuất từ Employee Tôi làm đơn giản là cách tính lương khác nhau. Đối với FullTime thì lương 500, Partime lương 150. và hàm Xuất toString() cũng khác nhau 1 xí.
- Ở đây ta sẽ áp dụng tính đa hình thông qua thừa kế, chỉ cần dùng một biến có kiểu Employee, nhưng nó có thể hiểu FullTime hoặc Partime và xuất ra thông tin đúng như mình mong đợi.
- Xem class MainActivity.java:
importjava.util.ArrayList;
importandroid.os.Bundle;
importandroid.app.Activity;
importandroid.view.View;
importandroid.view.View.OnClickListener;
importandroid.widget.ArrayAdapter;
importandroid.widget.Button;
importandroid.widget.EditText;
importandroid.widget.ListView;
importandroid.widget.RadioGroup;
publicclassMainActivity extendsActivity {
EditText editId,editName;
Button btnNhap;
RadioGroup radgroup;
ListView lvNhanvien;
ArrayList<Employee>arrEmployee=newArrayList<Employee>();
ArrayAdapter<Employee>adapter=null;
//Khai báo 1 employee object
Employee employee=null;
@Override
protectedvoidonCreate(Bundle savedInstanceState) {
super.onCreate(savedInstanceState);
setContentView(R.layout.activity_main);
editId=(EditText) findViewById(R.id.editMa);
editName=(EditText) findViewById(R.id.editTen);
btnNhap=(Button) findViewById(R.id.btnnhap);
radgroup=(RadioGroup) findViewById(R.id.radiogroud1);
lvNhanvien=(ListView) findViewById(R.id.lvnhanvien);
//đưa Data Source là các employee vào Adapter
adapter=newArrayAdapter<Employee>(this,
android.R.layout.simple_list_item_1,
arrEmployee);
//đưa adapter vào ListView
lvNhanvien.setAdapter(adapter);
btnNhap.setOnClickListener(newOnClickListener() {
@Override
publicvoidonClick(View arg0) {
// TODO Auto-generated method stub
processNhap();
}
});
}
//Xử lý sự kiện nhập
publicvoidprocessNhap()
{
//Lấy ra đúng id của Radio Button được checked
intradId=radgroup.getCheckedRadioButtonId();
String id=editId.getText()+"";
String name=editName.getText()+"";
if(radId==R.id.radChinhthuc)
{
//tạo instance là FullTime
employee=newEmployeeFullTime();
}
else
{
//Tạo instance là Partime
employee=newEmployeePartTime();
}
//FullTime hay Partime thì cũng là Employee
//nên có các hàm này là hiển nhiên
employee.setId(id);
employee.setName(name);
//Đưa employee vào ArrayList
arrEmployee.add(employee);
//Cập nhập giao diện
adapter.notifyDataSetChanged();
}
}
- Chương trình sẽ tự động hiển thị đúng loại Employee mà ta chọn lựa trên giao diện, ở đây bạn lại được ôn tập thêm về tính đa hình trong java. Ứng với mỗi loại Employee nó sẽ tự động gọi hàm toString của loại đó.
Ví dụ: Nếu Employee đó là FullTime thì nó gọi toString của FullTime và ngược lại với PartTime cũng vậy nó sẽ lấy toString của PartTime.
5)Trường hợp 5: Sử dụng ListView nhưng dưới dạng ListActivity
- Thay vì kế thừa từ Activity, ta sẽ cho kế thừa từ ListActivity.
- Và dĩ nhiên cách đặt Id cho ListView cũng có sự khác biệt.
- Bạn xem giao diện bên dưới:

Hình 18
- Xem cách làm XML layout (activity_main.xml):
<LinearLayoutxmlns:android="http://schemas.android.com/apk/res/android"
xmlns:tools="http://schemas.android.com/tools"
android:id="@+id/LinearLayout1"
android:layout_width="match_parent"
android:layout_height="match_parent"
android:orientation="vertical"
tools:context=".MainActivity">
<TextView
android:id="@+id/selection"
android:layout_width="match_parent"
android:layout_height="wrap_content"
android:background="#008000"
android:textColor="#FFFFFF"
android:textSize="20sp"/>
<ListView
android:id="@android:id/list"
android:layout_width="match_parent"
android:layout_height="wrap_content">
</ListView>
<TextView
android:id="@android:id/empty"
android:layout_width="wrap_content"
android:layout_height="wrap_content"
android:text="Không có gì cả"/>
</LinearLayout>
- Bạn nhìn vào dòng lệnh thứ 18:
android:id=”@android:id/list“, bạn viết y xì như thế này. Bởi vì nó là id được định nghĩa sẵn bên trong Android.
- Tiếp tục nhìn vào dòng lệnh 24:
android:id=”@android:id/empty“ , cũng là có sẵn của Android. Nó có tác dụng tự động thông báo khi ListView của bạn không có bất kỳ một phần tử nào cả.
- Xem class MainActivity.java:
importandroid.os.Bundle;
importandroid.app.ListActivity;
importandroid.view.View;
importandroid.widget.ArrayAdapter;
importandroid.widget.ListView;
importandroid.widget.TextView;
publicclassMainActivity extendsListActivity {
TextView selection;
String arr[]={"Intel","SamSung",
"Nokia","Simen","AMD",
"KIC","ECD"};
ArrayAdapter<String >adapter=null;
@Override
protectedvoidonCreate(Bundle savedInstanceState) {
super.onCreate(savedInstanceState);
setContentView(R.layout.activity_main);
//Thiết lập Data Source cho Adapter
adapter=newArrayAdapter<String>(this,android.R.layout.simple_list_item_1,arr);
//Gán Adapter vào ListView
//Nhớ là phải đặt id cho ListView theo đúng quy tắc
setListAdapter(adapter);
selection=(TextView) findViewById(R.id.selection);
}
@Override
protectedvoidonListItemClick(ListView l, View v, intposition, longid) {
// TODO Auto-generated method stub
super.onListItemClick(l, v, position, id);
String txt="postion = "+position +"; value ="+arr[position];
selection.setText(txt);
}
}
- Bạn nhìn vào dòng lệnh số 10: bạn thấy đấy, Tôi cho kế thừa từ ListActivity chứ không phảiActivity. (Android đã viết class ListActivity kế thừa từ Activity rồi). Tức là ListActivity cũng chính là Activity.
- Bạn nhìn vào dòng lệnh số 28:
setListAdapter(adapter);
Ở đây ta hoàn toàn không “Lôi” control ListView ra. Mà ta chỉ cần gọi hàm setListAdapter thì ListView cũng tự động cập nhập dữ liệu. Bạn phải làm chính xác 2 nơi thì mới được như vậy:
1. Kết thừa từ ListActivity,
2. đặt id cho ListView theo đúng quy tắc android:id=”@android:id/list”
Tham khảo: duythanhcse
*******
Một số tài liệu và khoá học bổ ích dành cho bạn:
# Giáo trình: Lập Trình Android [Click để xem]
# Khoá học online: Lập trình Android toàn tập [Click để xem]
-----------------------------------------
Xem thêm bài và ví dụ khác:
Bài 2: Kiến trúc Android
Bài 7: Các kiểu lập trình sự kiện trong Android
Bài 8:Tìm hiểu về Toast Notification và Alert Dialog
Bài 9:Sử dụng TextView, EditText và Button trong Android
Bài 10: Sử dụng Checkbox và RadioButton trong Android
Bài 11:Tìm hiểu về ListView
Bài 12:Tìm hiểu về Spinner trong Android
Ví dụ 1:Thiết kế giao diện với XML trong Android
Ví dụ 2:Xây dựng ứng dụng: Nhập vào tên bạn, sau đó in ra lời chào bạn
Ví dụ 3:Ứng dụng Giải phương trình bậc 2
Ví dụ 4:Xây dựng ứng dụng nhập vào số nguyên n; tính giai thừa của n, in kết quả
Ví dụ 5:Cài đặt Android SDK, Eclipse và thiết bị giả lập AVD
Bài 2: Kiến trúc Android
Bài 7: Các kiểu lập trình sự kiện trong Android
Bài 8:Tìm hiểu về Toast Notification và Alert Dialog
Bài 9:Sử dụng TextView, EditText và Button trong Android
Bài 8:Tìm hiểu về Toast Notification và Alert Dialog
Bài 9:Sử dụng TextView, EditText và Button trong Android
Bài 10: Sử dụng Checkbox và RadioButton trong Android
Bài 11:Tìm hiểu về ListView
Bài 12:Tìm hiểu về Spinner trong Android
Bài 11:Tìm hiểu về ListView
Bài 12:Tìm hiểu về Spinner trong Android
Ví dụ 1:Thiết kế giao diện với XML trong Android
Ví dụ 2:Xây dựng ứng dụng: Nhập vào tên bạn, sau đó in ra lời chào bạn
Ví dụ 3:Ứng dụng Giải phương trình bậc 2
Ví dụ 4:Xây dựng ứng dụng nhập vào số nguyên n; tính giai thừa của n, in kết quả
Ví dụ 5:Cài đặt Android SDK, Eclipse và thiết bị giả lập AVD
Ví dụ 2:Xây dựng ứng dụng: Nhập vào tên bạn, sau đó in ra lời chào bạn
Ví dụ 3:Ứng dụng Giải phương trình bậc 2
Ví dụ 4:Xây dựng ứng dụng nhập vào số nguyên n; tính giai thừa của n, in kết quả
Ví dụ 5:Cài đặt Android SDK, Eclipse và thiết bị giả lập AVD